...

6/30/12

Peach Coffee Cake with Almond-Oat Streusel


These past few days everything has been very peachy in my house. The peach tree in the garden continues to surprise me with the amount of fruit that is giving us. If you could look into my kitchen. I have baskets all around filled with peaches: peaches to give out to friends, peaches to cook with, peaches to eat, peaches everywhere! But I don't get tired ot them. So to change things up, per say, I made a Peach Coffee Cake with Almond-Oat Streusel. It is delicious: soft cake studded with sweet jucy peaches topped with acrunchy streusel. Just amazing.


Peach Coffee Cake with Almond-Oat Streusel
Adapted from Williams-Sonoma

Ingredients:
For the streusel:
1/2 cup all-purpose flour
1/3 cup firmly packed brown sugar
1/2 cup old fashioned oats
1/2 cup toasted almonds roughly chopped
6 tablespoons cold butter cut into pieces

For the Cake:
1 1/2 cups all-purpose flour
3/4 cup sugar
1 1/2 teaspoon baking powder
1/4 teaspoon baking soda
1/2 teaspoon salt
1 egg
4 tablespoons butter softened
1/2 cup sour cream
1 1/2 teaspoons vanilla extract
1 teaspoon almond extract
2 firm ripe peaches peeled and cut into 1 inch thick slices


Directions:
1. Preheat oven to 350F (180C). Grease and flour a 9-inch spring foarm cake pan.
2. For the streusel: in a bowl combine flour, brown sugar, oats, almond butter and salt. Using a pastry cutter or your fingers cut the butter or rub with your fingers to foarm coarse crumbs and set aside.
3. In a medium bowl sift together flour, baking powder and salt. Set aside. Using an electric mixer beat the butter and sugar together until light and fluffy. Add the egg and continue to mix. Add the flour mixture in three additions alternating with the sour cream (flour-cream-flour-cream-flour). Add vanilla and almond extracts and mix to combine.
4. Pour batter into prepared pan and spread evenly using a spatula. Arrange peach slices in concentric circles slightly pressing down into the batter. Sprinkle streusel on the top.
5. Bake for 40-45 minutes or until the toppping looks golden brown and a toothpick inserted in the center comes out clean. Remove from the oven and let it cool on a wire rack for about 10 minutes before removing from pan. Let cool completely.


Enjoy!

Martha.

6/24/12

Harvesting Peaches


The summer bounty is here! Our peach tree is ladden with fruit and we had to start picking the fruit about a week or two earlier than we had anticipated because it has become too heaby for the tree. We been supporting the branches, but sadly today we found a broken branch. To avoid more damage to the tree we picked the fruit from the broken branch and cut it so the tree could begin to heal.


Most of the peaches we picked were almost ready and they will ripen indoors. The ones that were too small and underipe I cooked them in simple syrup. 


They tasted great: tart and sweet at the same time. I'm really looking forward to what the summer will bring us and practice my canning skills.

I hope you had a nice weekend!
Martha.

6/17/12

Weekend Sewing


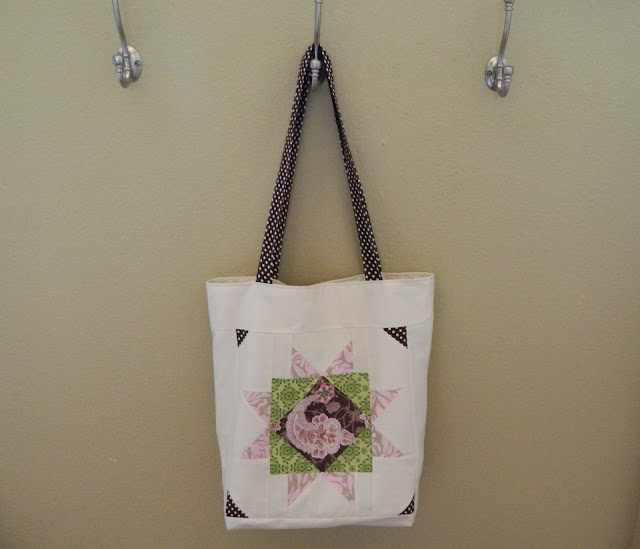
Today I had a very productive day in the sewing room. I finished a tote bag with the quilt block I made yesterday.


The block size is 12X12 inches, so the finished bag ended up being roomy enough to carry groceries, books or a quilting project. And I made the straps a bit longer to carry it as a shoulder bag.
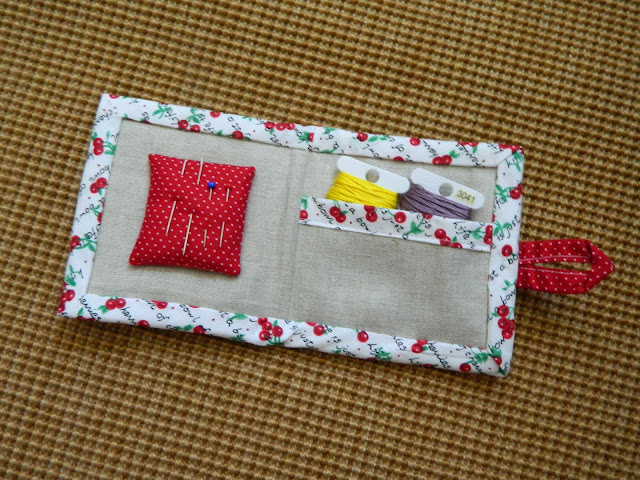
I also finished a small travel sewing kit, so I have needles and thread on hand when I'm away from home or carry embroidery floss to do a little stitching on the go.


As you can see from my fabric choices, I love polka dots. I find them so cheerful. I hope you had a nice weekend as well!

Martha

6/16/12

A New Quilt Block


I just got an amazing book about modern quilt blocks and I simply couldn't wait to try to make some of the blocks; without a project in mind, just for fun. Today I finished this one. It is called Megan's Star and I love the way it turned out. I think I am going to use this block as the focal point on a tote bag. I will share the results of the finished project with you.

Martha

6/11/12

Olive Oil-Yogurt Cake


Sunday was a great day; I spent most of the day outside gardening with my husband. Mini and Mona had to stay inside the house because it was a bit warm for them to be outside and Mona's allergies were acting up so we wanted to keep her away from pollen as much as possible. I don't think they minded staying indoors though; they stayed cool and napped most of the time. Once and a while they would come to they window to check on us, but they would go back to their beds.
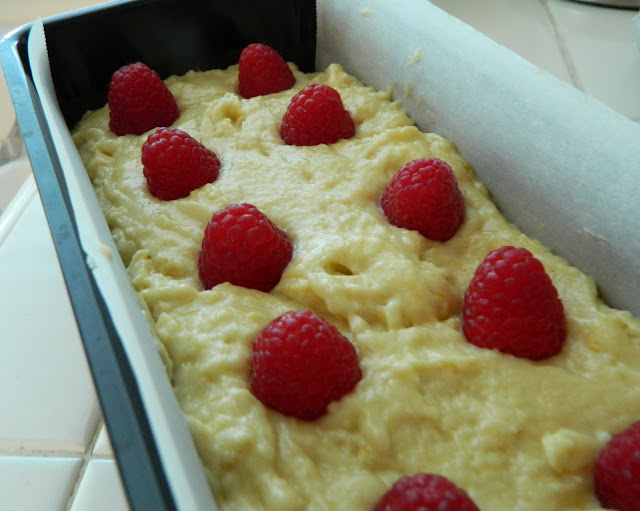
After working in the garden I decided to bake a cake. I had my eye on a French yogurt cake a saw in Bon Appétit weeks ago. As I started gathering the ingredients I realized I had run out of vegetable oil... I didn't want to go to the store (again) to get it since I had already gone in the morning. What to do? I know, improvise! I switched the vegetable oil for olive oil and embellished the cake with raspberries I had bought in my morning trip to the market. The results were beautiful and delicious. I had a piece for breakfast this morning and it tasted amazing!


Olive Oil-Yogurt Cake
Adapted from Bon Appetit
Serves 8
* I just arranged the raspberries on top as decoration, but if you wish you could mix the raspberries in the batter for a more intense raspberry flavor.
Ingredients
1 1/2 cups flour
2 teaspoons baking powder
3/4 teaspoon kosher salt
3/4 cup sugar
1 tablespoon lemon zest
3/4 cup Greek yogurt
1/2 cup olive oil
2 large eggs
1/2 teaspoon pure vanilla extract
1/2 cup raspberries


Method:
1. Preheat oven 350° F (180° C). Line a 9X5 loaf pan with parchment paper.
2. In a medium bowl whisk together flour, baking powder and salt. Set aside.
3. In a large bowl pour sugar and lemon zest and using you finger rub sugar and lemon zest together until sugar is moist. Add yogurt, olive oil, eggs and vanilla extract and whisk to blend well. Incorporate flour mixture and mix until well combined.
4. Pour batter into prepared pan and smooth the top. Arrange raspberries on top and bake for about 55 minutes or until a toothpick inserted in the center comes out clean. Allow the cake to cool in the pan for  a few minutes then transfer to a wire rack to cool completely.

Enjoy!

Martha.

6/8/12

Roses From The Garden


The roses in the garden have been blooming beautifly and today I went around the garden and snap some pictures to share with you.


Such a lovely display of color.

Martha.

6/1/12

Mini is OK!


As I mentioned on my previous post, Mini and Mona visited their vet's office last Saturday; they were due for their shots. Also I discovered a few days back a lump on Mini's neck.  Although, Mini never complained or showed signs that she was in any pain, my husband and I wanted to have it checked out  as soon as possible. Their doctor, Doctor C., gently examined the lump and advised us that a biopsy was recommended... when I heard those words a million thoughts rushed in to my head. What if there is something wrong with my baby?  My husband and I immediately agreed to the procedure; as sacred as we were we needed to know to better care for Mini. The procedure only took a few minutes and Mini was very brave and stayed still the whole time. The hardest part was waiting for the results... Dr. C. was kind enough to give us the results as soon as the tests were completed and were were very excited to learn that Mini is OK! The lump turned out to be a benign tumor made out of fatty tissue. It is such a relief! Mini already has a heart murmur for which she needs to have constant medical care. I just don't want her to be sick.
We thank God our baby is OK!

Martha.